You are here: ILT > Setting Up ILT Events, Tracks, and Sessions > ILT Sessions > Editing ILT Session Information

Editing ILT Session Information

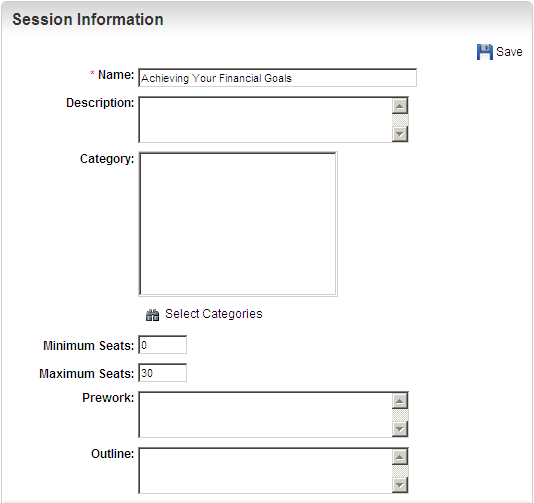
You can quickly edit an ILT Session name and description. On the ControlPanel:

  1. Click on the ILT menu to expand it.
  2. Click Instructor Led Training.
  3. Use the Filters section to search for the Session you want.
  4. Click next to the Session.

  1. Type the Session Name, or leave the default name.
  2. Type a Description for the Session, or leave the default description.
  3. (Optional) Click Select Categories. The Categories Selector window opens.
  4. (Optional) Click the check boxes next to the Categories you want to associate with the Session.
  5. Click Return Selected.
  6. Type the number of Minimum Seats. (Default is 0.)
  7. Type the number of Maximum Seats. (Default is 30.)
When you add an Enrollment and this maximum seat number is reached, no more students will be allowed to enroll in the class.
  1. Type a description of any Prework you want the students to complete for this Session.
  2. Type the Outline of the Session.

  1. Click the Start Date field and use the pop-up calendar to select the date you want the Session to begin.
  2. Select the start time from the drop-down list.
  3. Click the End Date field and use the pop-up calendar to select the date you want the Session to end.
  4. Select the end time from the drop-down list.
  5. Select a Time Zone from the drop-down list.

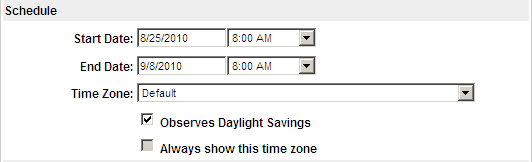
The following Time Zone rules apply for ILT sessions:

  • If the ILT Session is created without a location, the default is the LearnCenter's Time Zone. However, if the location is later mapped to the ILT Session, the ILT session's Time Zone is over written with that of the location.
  • Making changes to the location Time Zone does not update the ILT Session's Time Zone. You must map a different location and then re-map the same location to update the ILT Session with the new location Time Zone, or change the Time Zone for the ILT session to match the location.
  • Administrators can also change the Time Zone of the ILT session once it is mapped to the location.
  • You can select the LearnCenter’s Time Zone instead of using the server Time Zone.
  • All the dates and times that are stored in the LearnCenter using the server's timestamp for the learning event are stored in Eastern Standard Time. These dates and times are converted using the server's built-in Time Zone conversion. The server's timestamp is of web server or database server, but both servers use the same Time Zone.
  • The Time Zone priority for users is as follows:
  1. User Time Zone
  2. LearnCenter Time Zone
  3. Parent LearnCenter or Parent Root Time Zone
  4. Server Time Zone

The Time Zone priority accessed through the ControlPanel is as follows:

  1. Learning Event Time Zone
  2. LearnCenter Time Zone
  3. Parent LearnCenter or Parent-Root Time Zone
  4. Server Time Zone
  1. Select one of the following from the Observes Daylight Savings drop-down list:
  1. Click the Always Show This Time Zone check box to indicate you want the learning Event's time zone displayed to the User.

    or

    Clear the check box to display and convert the learning Event's dates into the User's time zone. (Default)

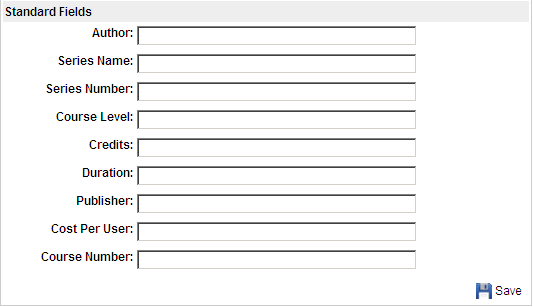
The following fields are optional.

  1. Type the name of the Author.
  2. Type the Series Name.
  3. Type the Series Number.
  4. Type the Course Level.
  5. Type the number of Credits.
  6. Type the length of the Duration of the Session.
  7. Type the name of the Publisher.
  8. Type the Cost Per User.
  9. Type the Course Number.
  10. Complete any Custom Fields you may have added. These fields do not display unless you have added some.

  1. Select the check box beside each section heading you do not want displayed to the Users enrolled in this Session.

    or

    Clear the check box beside each section heading you do want displayed to the Users enrolled in this Session.
See Variable Display of ILT Enrollment Information to Users for details about this feature.
  1. Click Save. Additional sections are added to the Session Information page.

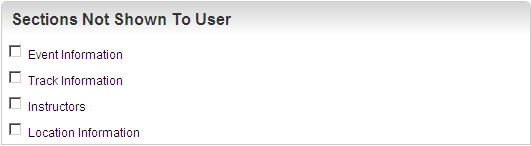
You can now map the following items to the Event if necessary. You do not have to add them at this time. You can always edit the properties of this Event later, and map additional items to it at that time.

Related Topics IconRelated Topics


Copyright © 2010-2015, Oracle and/or its affiliates. All rights reserved.